Video slitscan/time displacement: hows does they work

i’m working on my raspberry pi based time displacement project rn and there is kind of a regular bit of downtime when recompiling and debugging things on the pi so thought id write down some stuff on the basic concepts while shits all make && make running whoops “SEGMENTATION ERROR EXIT CODE” etc

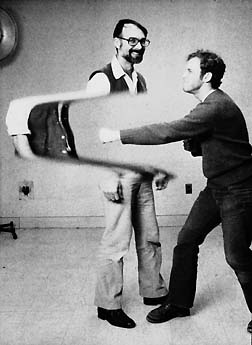
Id like to make a distinction between slitscanning and time displacement in this context here. Slitscanning is a process originated in film photography where only a tiny portion of film for 1 picture gets exposed at any given time, typically via some kind of mechanical apparatus that sits over the lens and restricts light flow This allows one to capture a wide range of time slices into one singular photograph.
unnamed

if one has ever played with opening shutters in low light scenarios and goofing around then you’ve got a pretty decent idea already of how this works. one can do some pretty crazy stuffs either by leaving a shutter open in extremely low light and then slowly moving around the frame and/or by using flashlights/laser pointers to expose portions.

this method works extremely well for still photography but proved somewhat cumbersome to abstract for video usage in the old analog days. Famously the climax of 2001 featured slit scan effects to create the multidimensional tunnel sequence thing but the thing to note about how this was managed is that each singular Frame for that sequence was created as a slitscan photograph and then each photograph was used for essentially stop motion animating the sequence. more details on that process over here!

The main problem for abstracting slitscanning into something that works as an animation was (and to a certain extent still is) memory! without some kind of a digital framebuffer around to store rather massive amounts of video inside folks had to just resort to the old school analog ‘framebuffer’ i.e. just fucking filming it. this is a pretty common issue in video tool design, video is fundamentally a multidimensional signal and the more dimensions a signal has the more difficult it is to scale operations from 1 time slice (still image) to any given number of slices.

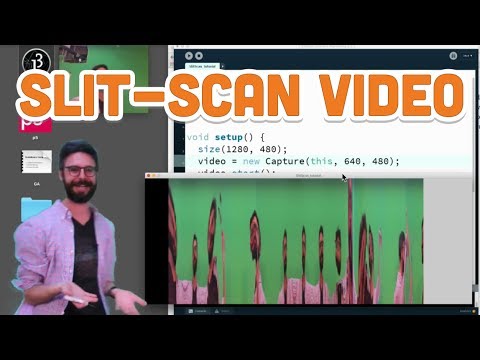
but wait what about this?

t clearly says ‘slit scan video’ and looks like there some video things happening! and its all written in Processing so can’t be that difficult to manage! Yes it is true that portions of this image are updating at video rate from a live video input! however compare that to this

and we can see that there is something pretty fundamentally different happening here.

In shiffmans vid up above we can see that we are updating just one single line of video pixels at any given point in the video. This is more like the old school slitscan photography technique abstracted with some simple digital logic but we don’t exactly get a video feel out of it as an overwhelmingly significant of the pixel informations on the screen are essentially static in time as soon as they get written into the draw buffer.

In the zbigniew film we can see that EVERY single pixel is getting updated in every single frame allowing for an intensely surrealistic experience! This is the real deal time displacement. This is also pretty massively bulky to manage in terms of memory as in order to not have visible quantization artefacting zbigniew had to painstakingly reassemble the film over a course of months at a temporal resolution of 480 horizontal lines so that the top line of pixels in each frame is the most ‘recent’ time slices and the bottom line of pixels in each frame is from 480 frames in the past (assuming this was at 24 fps means that there is a 20 second difference from top to bottom in each frame).

i’ve long wanted to abstract this kind of process into something that could work as a general purpose real time av tool for digital and analog video stuffs and i’m making pretty good progress on my thing so far. Even with modern microcomputers/nanocomputers working at SD resolutions it can get pretty tricky to keep things from slowing down into mush or just crashing hard at certain resolutions so i’ve been working on seeing how low res i can go and still have some fun zones. Right now for both the deskop and rpi versions i’m working on i can get at least 480 frames of past video stored but the caveat is that the video inputs are natively working at 320x240 and that the video information is being stored as low level pixels at the depth of chars meaning that one can’t really exploit any sort of GL parallelism to speed things up, its currently a very brute force affair. To control how time displacement works in these instead of working with any kind of fixed gradient mapping i built some low res oscillators so that one can sort of oscillate a video through time.

these things are still pretty raw in developement and i still have a fair amount of spare knobs and shit i can devote to controling things on the rpi version so i’m interested to hear what anyone might want to see out of this kind of thing. something im still working out is a ‘freeze’ function that grabs a contiguous slice out of the 480 frames and freezes the input at that point so you can have time loops to work with. controls for quantisation and some hacky attempts to smoothing things out are all in process as well!
4 Likes

For an example of how others have implemented this effect, see SSSSCAN, a Signal Culture app.

3 Likes

:star_struck: Looking at this with great interest. I find this kind of image distortion fascinating and I’d love to add this to my toolbox. Personally, I welcome any compromises about resolution or color depth if they allow for a raspberry to produce such magic (I’m currently working at 576p anyway, often with B/W sources at even lower resolution)

1 Like

did some test on this with analog video feedback just now, its looking pretty gorgeous even with all of the resolution and color depth scronkiness, will try and get some demo vids of the hardware in action up when possible

3 Likes

Hmm, I pretty much built this exact software platform for atemporal / time displacement animation as a thesis project in school AGES ago. I had the same issues with memory as you’re describing - this was probably my first serious encounter with a proper “computer science” problem, before I really had any serious experience programming, and it’s not really gotten easier fifteen years later :slight_smile:

Part of the thing that makes it tough (in my use-cases anyway) is that — there were some cases where one localized region of input video would be mapped to many different output pixels. And, cases where one region of output video would be mapped to many different input pixels… So, you can’t easily just group the output or the input video into blocks and do caching based on those. I had a simple mapping function from input to output pixels, but ideally you’d want a proper displacement map, e.g. ANOTHER frame that describes where to pull input pixels from for each output pixel - this makes it even tougher b/c you can’t easily guess which pixels to load before you need them.

If I had to sketch together an architecture based on what I did back then, plus things I’ve learned since, it might be something like… (SORRY, APOLOGIES IN ADVANCE for digging in too deep on this - I’ve spent so many years in this exact problem space, it’s hard not to go deep :slight_smile: )

  1. An API to load horizontal bands of input images (e.g. full width + arbitrary pre-defined height, 16 px or whatever) from disk.
  2. An in-memory most-recently-used cache of these blocks (to minimize disk access).
  3. An API to load and write pixels to horizontal bands of output images.
  4. An in-memory MRU cache of output blocks.
  5. A disk-bound work queue to load / flush blocks from caches #2 and #4
  6. A CPU-bound work queue to produce the displacement map images.
  7. Finally, some kind of “processor” that takes the displacement map images, loads the correct blocks from #1 and #3, and writes the remapped pixels from input to output.

The way you break up the pieces of work in #7 is the important part - I guess you wanna use as much of any input / output band as you can while it’s in memory. Your tuning is going to be along the lines of ---- how you break up the displacement map into smaller pieces and process those? IIRC I was basically lazily loading input frames until I ran out of memory, then processing all the pieces of my output that depended on these frames, then flushing them and continuing to do passes until I had finished writing my output frames.

It’s a bit harder to do this with a GPU, because you need an extra layer of caching in #2 / #4 (e.g. you need to go from Disk <> Memory <> GPU Memory), but it’s probably worth it for the speed-up you’d get from processing on GPU (though who knows on an PI…).


These are the vids I was doing when I wrote this stuff. The displacement was vertical bands of pixels (so, keeping it sorta in the lineage of slitscanning…), described by bezier curves that could be animated over time, plus some perlin noise if I wanted something more shimmery/bumpy.

https://drive.google.com/file/d/1e4lZXM6cn4PAg5OD3V2Ut1eYx7iiz8Vk/view
https://drive.google.com/file/d/1KhRfZxpzul7EE7qzkjwEU2s8dTYeBss8/view

One of the more interesting usages of these techniques is Robert Twomey’s Rover project. Rather than doing time remapping per se, Robert was taking photos displaces in space and summing them to produce what are basically impossible lenses. On the surface it looks different from the time displacement stuff - but the process is almost identical, just a different way of capturing and slicing.

hxxp://roberttwomey.com/rover/
(sorry, two link limit for new users)

4 Likes

I cobbled together some C++ (with help from Cinder) to do one kind of “redimensionated” video. It

  1. Loads one column of pixels from each frame of video into the first frame
  2. Loads the second column of pixels from each frame of video to the second frame
  3. Etc.

The code is nearly 10 years old now, so I’d be surprised if it compiles and works: https://github.com/forresto/Redimensionator

In this one, you can see the whole owl’s flight in some frames:

2 Likes

this is beautiful! i have been having a lot of dang fun with slo mo hummingbird footage and slitscans too in my own experiments

In this video I use a brute force method for slit scan animation. Some 100 frames are loaded into a GL_TEXTURE_2D_ARRAY of the graphics card. Than I can quickly access all pixels of all loaded images in each frame. Which pixel of the current frame comes from which loaded image is described by a Lisp expression.

In this example k is the index that selects from which image to read. What looks like Lisp here is translated into fragment shader code. Both image data and algorithms are located on the graphics card.

(hsv :imgs0 [c0]
(k (mix 0 sframe (usin (* 0.1 r))))
(hsv (* (vec3 1 1 2) c0.hsv))
)

Skript used for this slit scan video

2 Likes

Tried a combination of slitscanning and time displacement. Some pixels are updated at each frame. This is the time displacement part of this animation.

Other pixels are remains of former image frames. The area where old - not overwritten - pixel remains is growing during the animation.

1 Like

Somehow I didn’t realize you’d already publicly released this, good thing I already had another Pi3 on the way, although I’ll have to get another EZcap and Nanokontrol and some TRRS jacks to make more a/v cables as soon as I have the money available so I can run all three at once. In the mean time I’ll probably swap Spectral Mesh out for this for next Tuesday’s stream, it seems like it should work really well at the same spots in the signal path that I’ve been using Spectral Mesh.

1 Like

Been getting really good results out of it even without knowing how all the controls are mapped on the Nanokontrol yet. Great in feedback loops, great keyed over a feedback loop or auto_waaave. Once I get one more Nanokontrol and build a colorizer my setup will be pretty much done for a while.